参考博文
https://blog.csdn.net/qq_34205629/article/details/122375262
下载内核
android studio 打开 X5Demo(官方 demo),
- 点击”TBS 调试“
- 点击”安装线上内核“
- 控制台查看日志输入:
1 | { |
git fetch origin dev-xxx
git checkout -b dev-xxx origin/dev-xxx
参考
https://wiki.t-firefly.com/zh_CN/Firefly-RK3399/driver_gpio.html
Rockchip GPIO 常见问题.pdf
Rockchip_RK3399TRM_V1.4_Part1-20170408.pdf
基本说明
本文内容来源于调试广州眺望电子科技有限公司 rk3399 开发板的过程中总结的经验。
从 Rockchip_RK3399_Datasheet_V2.1-20200323.pdf 入手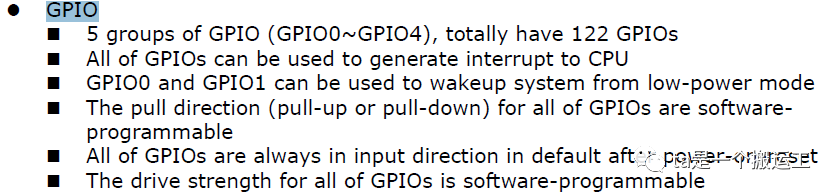
| 起始 | 结尾 | 个数 |
|---|---|---|
| GPIO0_A0 | GPIO0_A7 | 8 |
| GPIO0_B0 | GPIO0_B5 | 6 |
| GPIO1_A0 | GPIO1_A7 | 8 |
| GPIO1_B0 | GPIO1_B7 | 8 |
| GPIO1_C0 | GPIO1_C7 | 8 |
| GPIO1_D0 | GPIO1_D0 | 1 |
| GPIO2_A0 | GPIO2_A7 | 8 |
| GPIO2_B0 | GPIO2_B4 | 5 |
| GPIO2_C0 | GPIO2_C7 | 8 |
| GPIO2_D0 | GPIO2_D4 | 5 |
| GPIO3_A0 | GPIO3_A7 | 8 |
| GPIO3_B0 | GPIO3_B4 | 5 |
| GPIO3_C0 | GPIO3_C7 | 8 |
| GPIO3_D0 | GPIO3_D4 | 5 |
| GPIO4_A0 | GPIO4_A7 | 8 |
| GPIO4_B0 | GPIO4_B5 | 6 |
| GPIO4_C0 | GPIO4_C7 | 8 |
| GPIO4_D0 | GPIO4_D6 | 7 |
RK3399 有 5 组 GPIO bank:GPIO0GPIO4,每组又以 A0A7, B0B7, C0C7, D0D7 作为编号区分(不是所有 bank 都有全部编号,例如 GPIO4 就只有 C0C7, D0~D2)。所有的 GPIO 在上电后的初始状态都是输入模式,可以通过软件设为上拉或下拉,也可以设置为中断脚,驱动强度都是可编程的。
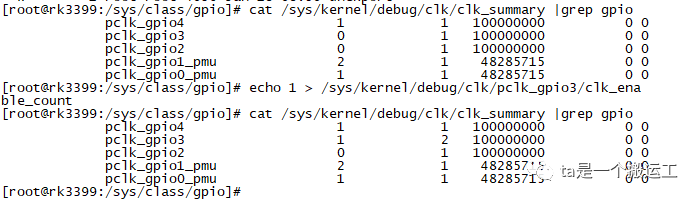
时钟使能
控制之前首先确保相关时钟已经使能,比如:
1 | cat sys/kernel/debug/clk/clk_summary |grep gpio,查看时钟使能状态 |
注意:要想看到/sys/kernel/debug,需要配置内核及挂载debugfs
内核配置文件.config 中 CONFIG_DEBUG_FS=y,
挂载 debugfs,mount -t debugfs none sys/kernel/debug
操作
sys/class/gpio 方式
使用/sys/class/gpio 方式控制 GPIO 时,指定 gpio 的值的计算方式如下:
| GPIO bank | 基值 | GPIO group | 基值 |
| ——– | ——– | —- | —- |
| GPIO0 | 0 | A | 0 |
| GPIO1 | 32 | B | 8 |
| GPIO2 | 64 | C | 16 |
| GPIO3 | 96 | D | 24 |
| GPIO4 | 128 | E | 0 |
计算公式为:管脚索引号 = bank * 16 + group * 8 + index如GPIO2_B6:2 * 32 + 1 * 8 + 6 = 78
示例:
蓝牙状态指示灯,GPIO2_D3:2 * 32 + 3 * 8 + 2 = 91
向/sys/class/gpio/export 导出指定的管脚:
1 | echo /sys/class/gpio/91 > export |
设置 gpio 为输出方向:
1 | echo out > /sys/class/gpio/gpio91/direction,out表示输出,in表示输入 |
输出高电平:
1 | echo 1 > /sys/class/gpio/gpio91/value,1表示高电平,0表示低电平 |
直接操作寄存器控制 GPIO
当设备树有控制 GPIO 时,使用/sys/class/gpio/的方式会出现冲突。如下:
1 | [root@rk3399:/sys/class/gpio]# echo 149 > export |
可以更改设备树配置或者直接操作寄存器解决。
执行 cat /sys/kernel/debug/gpio 查看当前管脚状态,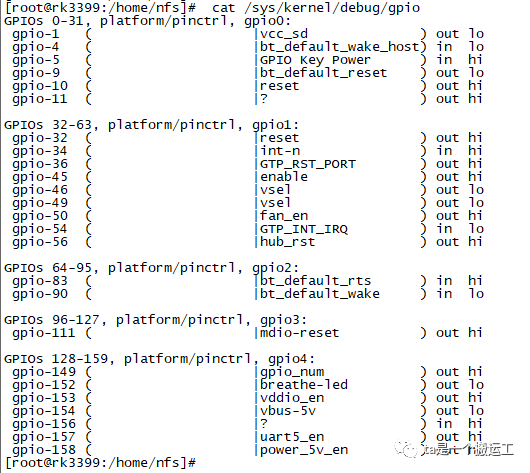
gpio-149 对应管脚 GPIO4_C5,
1:设置管脚复用寄存器,2:设置方向寄存器,3:设置数据寄存器
查看手册,管脚复用寄存器(GRF_GPIO4C_IOMUX:0xff77e028,GRF 的映射基址为 0xff770000)当前的值设置了 GPIO4_C5 为 GPIO 工作模式,GPIO4 映射基址为 0xff790000,
0xff790000 保存了当前 32 个 GPIO 的电平值,0xff790004 保存了当前 32 个 GPIO 的方向,
所以只要设置方向寄存器和设置数据寄存器即可,
1 | [root@rk3399:/home/nfs]# io -4 -l 8 0xff790000 |


可以看出 GPIO4_C5 为输出高电平状态,
通过执行 io -4 -w 0xff790000 0x62400000,可以控制 GPIO4_C5 为输出低电平状态,此时执行 cat /sys/kernel/debug/gpio 可以看到变化。
- 查看 GPIO 与物理引脚的对应关系
本文以 GPIO0_A6 为例,即电路板上的 CPU 引出的零号第六个引脚,查看硬件线路与系统 gpio 路径的对应关系。
其中 rk3399 P2 引出的 GPIO0_A6 原理图与实物,如下: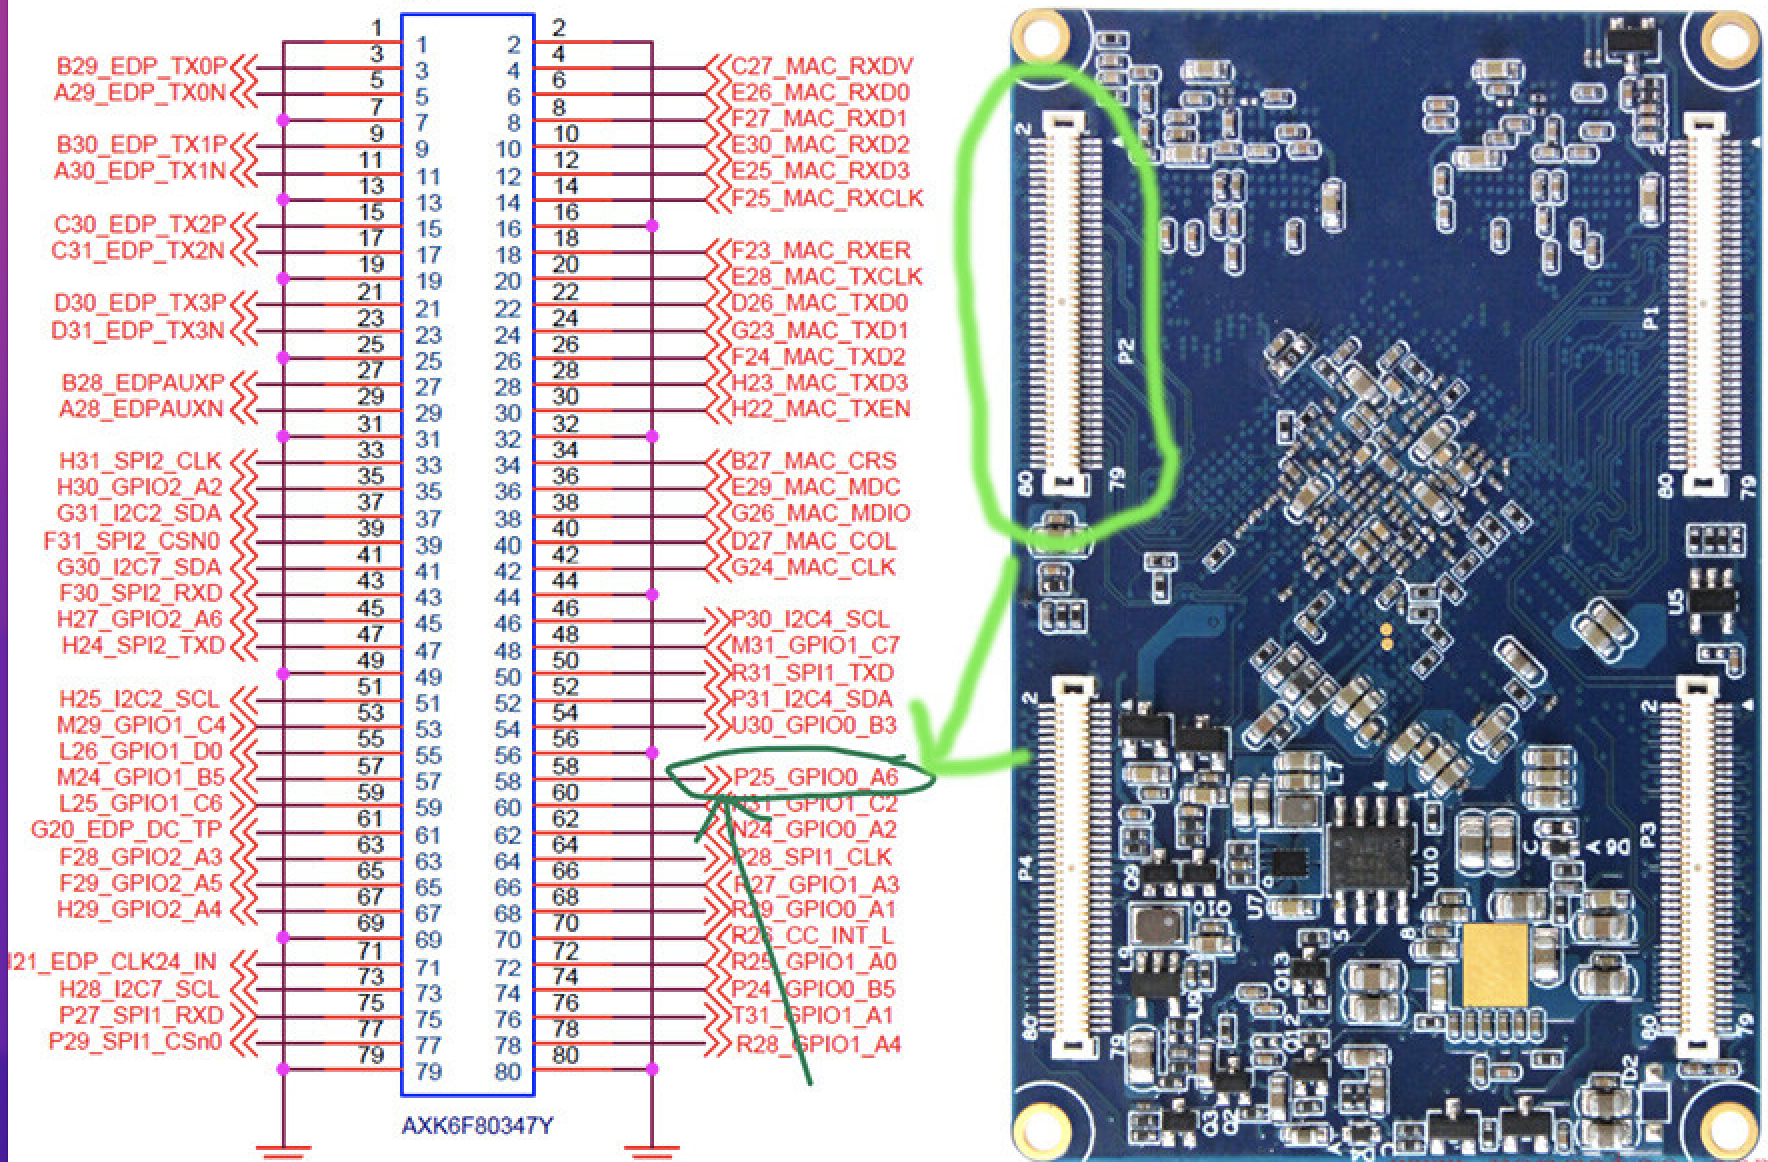
首先需要计算对应的 gpio number 的值,可以通过/sys/kernel/debug/gpio 查询信息:
1 | rk3399_firefly_aioc_ai:/ $ cat /sys/kernel/debug/gpio |
通过上面的返回结果可以看到,GPIO1 是以 nubmer 为 32 开始, 那么 GPIO1*A0 就是 1 * 32 + 0 _ 8 + 0 = 32。
然后查看/sys/class/gpio 目录下存在的 gpio,这时候并没有 gpioxxxx_32,需要我们导出一个。
1 | rk3399_firefly_aioc_ai:/ $ ls /sys/class/gpio |
- Android 系统导出 GPIO
导出时需要切换到 root 执行 export 命令,否则权限阻止,导出命令如下:
1 | rk3399_firefly_aioc_ai:/sys/class/gpio $ su |
此时就会发现多了一个 gpio32 的文件夹, 这个文件对应着 GPIO1_A0 引脚对应的功能。
注意:由于 rk3399 kernel 自带了通用 GPIO 驱动,所以这里可以直接 export 对应的引脚。
- Android 系统在用户空间使用系统命令控制 GPIO
这里我们把 gpio32 设置为输出,这样用万用表测量起来比较方便。
进入到 gpio32 文件夹,然后 echo out > direction,如下:
1 | rk3399_firefly_aioc_ai:/sys/class/gpio # cd gpio32/ |
- GPIO 功能测试
使能与关闭只需向 value 里传 1 和 0 即可,如下:
1 | # 使能 |
使能 gpio32 引脚,用万用表测量下对应的针脚是否为 1.8V(FET3399-C 核心板引出的 GPIO,除了 RGMII 和 MDC,MDIO 是 3.3V 的,其余 GPIO 全部是 1.8V 电平)。