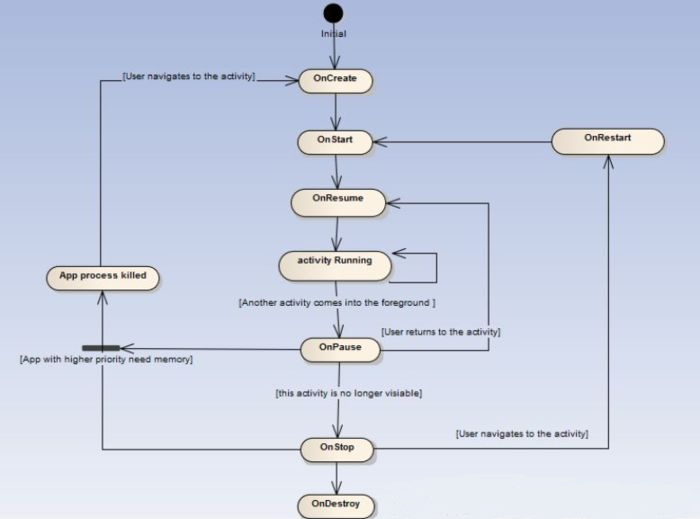
虽然变量被清空了,但Android给了一些补救措施。activity栈没有被清空,也就是说A -> B -> C这个栈还保存了,只是ABC这几个activity实例没有了。所以回到App时,显示的还是C页面。另外当activity被强杀时,系统会调用onSaveInstance去让你保存一些变量,但我个人觉得面对海量的静态变量,这个根本不够用。返回到B会白屏,是因为B要重绘,重走onCreate流程,渲染上需要点时间,所以会白屏了。
从Log可以看出,第一次调用startService方法时,onCreate方法、onStartCommand方法将依次被调用,而多次调用startService时,只有onStartCommand方法被调用,最后我们调用stopService方法停止服务时onDestory方法被回调,这就是启动状态下Service的执行周期。接着我们重新回过头来进一步分析onStartCommand(Intent intent, int flags, int startId),这个方法有3个传入参数,它们的含义如下:
1
onStartCommand(Intent intent, int flags, int startId)
/** * Created by zejian * Time 2016/10/2. * Description:绑定服务简单实例--服务端 */ public class LocalService extends Service{ private final static String TAG = "wzj"; private int count; private boolean quit; private Thread thread; private LocalBinder binder = new LocalBinder();
public void onServiceDisconnected(ComponentName className) { // This is called when the connection with the service has been // unexpectedly disconnected -- that is, its process crashed. mService = null; mBound = false; } };
@Override public int onStartCommand(Intent intent, int flags, int startId) { int i=intent.getExtras().getInt("cmd"); if(i==0){ if(!isRemove) { createNotification(); } isRemove=true; }else { //移除前台服务 if (isRemove) { stopForeground(true); } isRemove=false; }
Service 则是android系统中的组件,一般情况下它运行于主线程中,因此在Service中是不可以执行耗时操作的,否则系统会报ANR异常,之所以称Service为后台服务,大部分原因是它本身没有UI,用户无法感知(当然也可以利用某些手段让用户知道),但如果需要让Service执行耗时任务,可在Service中开启单独线程去执行。
final Intent serviceIntent=new Intent(); serviceIntent.setAction("com.android.ForegroundService"); serviceIntent.setPackage(getPackageName());//设置应用的包名 startService(serviceIntent);
将隐式启动转换为显示启动
1 2 3 4 5 6 7 8 9 10 11 12 13 14 15 16 17 18 19
public static Intent getExplicitIntent(Context context, Intent implicitIntent) { // Retrieve all services that can match the given intent PackageManager pm = context.getPackageManager(); List<ResolveInfo> resolveInfo = pm.queryIntentServices(implicitIntent, 0); // Make sure only one match was found if (resolveInfo == null || resolveInfo.size() != 1) { return null; } // Get component info and create ComponentName ResolveInfo serviceInfo = resolveInfo.get(0); String packageName = serviceInfo.serviceInfo.packageName; String className = serviceInfo.serviceInfo.name; ComponentName component = new ComponentName(packageName, className); // Create a new intent. Use the old one for extras and such reuse Intent explicitIntent = new Intent(implicitIntent); // Set the component to be explicit explicitIntent.setComponent(component); return explicitIntent; }
调用方式如下:
1 2 3 4
Intent mIntent=new Intent();//辅助Intent
mIntent.setAction("com.android.ForegroundService");
final Intent serviceIntent=new Intent(getExplicitIntent(this,mIntent));
startService(serviceIntent);
/** * Created by zejian * Time 2016/10/4. * Description:用户通过 settings -> Apps -> Running -> Stop 方式杀死Service */ public class ServiceKilledByAppStop extends Service{
A VNC Server for Android allows remotely accessing the device’s screen. In this post, I will show you how to run a VNC server on Android and access its screen remotely.
Let us clear one thing up front. We are not going to be discussing VNC clients for Android. We are going to be looking at the other side of Virtual Network Computing (VNC), which is running an actual VNC server on Android device.
Information on how to remotely access Android device’s homescreen or interface is sparse. Most of the information out there seem to look at the reverse scenario - accessing a remote server on Android device using VNC Client app. Read: Setup VNC Server on Ubuntu: Complete Ubuntu Remote Desktop Guide Setting up a VNC server for Android just as simple. In this post, I will show you how to setup an Android VNC server without root.
WHAT IS A VNC SERVER?
VNC stands for Virtual Network Computing. It is a way of sharing the graphical desktop of a system to a remote system. In addition to the graphical interface, input events (keyboard, mouse, etc.), audio, and clipboard can also be shared with the remote system.
This is a super cool way to access remote systems and works as if you are actually in front of the remote workstation. With my recent move to Proxmox, VNC setup on Ubuntu Server has as been very handy for me. [Read: Ultimate Docker Home Server with Traefik 2, LE, and OAuth / Authelia [2020]]
In this post, we are going to try to access my Android phone’s interface via VNC from a Windows laptop.
What can you do with VNC Server on Android?
Well, this is the million dollar question isn’t it?
Sometimes I want to check what is showing on the dashboard, which having to be in front of it.
SmartHomeBeginner brings in-depth tutorials easy enough to understand even for beginners. This takes considerable amount of work. If this post helps you, please consider supporting us as a token of appreciation:
Feeling generous? Buy me a coffee (or two).
May be another day? Shop on Amazon using our links. Your prices won’t change but we get a small commission.
Don’t feel like spending? You can still show your support by sharing this post, linking to it in forums, or even commenting below. That is just one application. If you have other applications you can think, please share with the rest of the us in the comments section.
VNC SERVER FOR ANDROID WITHOUT ROOT
While there are numerous VNC clients for Android, there aren’t many VNC Server Android apps. In fact, when I did my research I could only find one that worked well: droidVNC-NG.
The best part is, droidVNC-NG app is free. Go ahead, head to the Play store and install droidVNC-NG and let us get started with setting up an Android VNC server. Alternatively, if you have droidVNC-NG VNC server Android apk, install it and proceed.
Is VNC Server free? It depends on the server app. Some are paid. But there are free ones too (eg. droidVNC-NG for Android). Once a VNC Server is running, there are several free client apps to access the server.
VNC Server Port and Password When you open the app, you should see an Android VNC server interface that looks like what is shown in the image below.
First, provide a port number for VNC server. Typically it is 5900. But you could change it to whatever (typically 59xx). In this Android VNC server guide, I am going to use 5902.
Next, provide a password for the VNC connection. Pick a strong password. In this tutorial, I am picking test (NOT a strong password).
We are not going to be discussing advanced configurations such as VNC through SSH tunnel, which provides an encrypted connection. Therefore, setting up a strong password is a bare minimum for security.
Accessibility Permissions for Android VNC Server Next, we need to enable Accessibility permissions for the Android VNC server. This allows remote control of the Android device. So click on Screen Capturing and grant accessibility permissions to droidVNC-NG app, as shown below.
Grant View and Control Permissions We also need to grant view and control permissions to the VNC server for Android. Click on Input to grant this permission in the screens that follow (shown below).
Grant File Access Permissions to VNC Server on Android Finally, click on File Access on the droidVNC-NG app configuration screen. Allow the app to access files on your android device, as shown below.
Start VNC Server on Android Finally, hit the start button to start VNC server for Android. You will be presented with the warning screen shown below.
Carefully read and understand the implications prior to continuing. Once started, the Android VNC server should be listening for connections on the port you chose (5902 in this how-to).
In addition to the port number, you will also need the IP address of the Android device. As shown above, in this guide it is 192.168.1.120, which is the LAN IP address of my Android device.
If you are trying to access an Android system from outside your local network, then remember to setup port-forwarding on your router/gateway.
CONNECT TO ANDROID VNC SERVER
Now that our VNC Server on Android is running, let us see how to access the screen remotely. There are multiple ways to do this.
One of my favorite ways is to use Guacamole, which offers a HTML5 browser based access to VNC servers.
But for simplicity, in this guide, we are going to use TightVNC client for Windows. Using this VNC client app, we will view the Android device from my Windows system.
Provide VNC Server details on the Client app Open the VNC client and provide the IP address and port number. In this case, they are 192.168.1.20:5902.
Wait!!! But the image above shows 2, and not 5902 for port.
As explained previously, VNC ports are usually in the range 5900 to 5999. For VNC ports, it is customary to provide only the incremental number from 5900. Therefore, for port 5902, the increment is 2. The TightVNC client app automatically trims the port number down to just the incremental number.
Provide VNC Password Next provide the VNC password that you chose while setting up the VNC Server for Android.
SmartHomeBeginner brings in-depth tutorials easy enough to understand even for beginners. This takes considerable amount of work. If this post helps you, please consider supporting us as a token of appreciation. 3. Access Android VNC Server on Windows You should now be able to remotely access and interact with your Android device. You could work on it and control it using your mouse (and keyboard) - mouse-click to select, click and drag to move screen or scroll, etc.
So there you have it - the full graphical interface of Android that can be remotely controlled from practically any platform.
FINAL THOUGHTS ON RUNNING A VNC SERVER ON ANDROID
While this is all fun to do, I want to share my experience in using VNC Server for Android without root. Simply put, the performance was not great and it was not a smooth experience controlling the Android device using a mouse. It was choppy and slow. And this was on my Pixel 3, which has decent specifications at this point (March 2021).
On older Android devices, the experience might be even worse. Nevertheless, the droidVNC-NG app works great, is really one of a kind at this point, and free to use.
There are alternatives such as the VNC Server app from XDA Developers. This app allows both wifi and USB access. Wired access may provide a smoother experience but I have not tried this yet. If you have tried this, I would appreciate if you share your experience in the comments.
Other than that, it was a fun and easy project to setup a VNC Server for Android and access it remotely.
# 指定国内服务
settings delete global captive_portal_https_url
settings delete global captive_portal_http_url
settings put global captive_portal_https_url https://connect.rom.miui.com/generate_204
settings put global captive_portal_http_url http://connect.rom.miui.com/generate_204

# 时钟源
setprop persist.sys.timezone Asia/Shanghai
settings put global ntp_server ntp1.aliyun.com